Project 3: Reverse Engineering
Due: Monday, November 20, 2017, 23:59
Goal
Unlike the previous project where you were given access to the source code of the target programs, for this project, you will have to find the vulnerabilities using only the binary, IDA Pro (or BinaryNinja or radare2), and gdb.
All work in this project must be done on bertvm or ernievm.
You are given a single server binary which is a very simple webserver. The server program takes an optional argument specifying the port it listens to. It defaults to port 80 which will not work because it requires root privileges.
$ cd webroot
$ ./server <PORT>
Select a value for <PORT> that’s greater than 1024. See below for details on how to run the binaries on bertvm and ernievm.
Your goal is to write two exploit programs: fixed.py and randomized.py to exploit the webserver and launch a bind shell.
- For
fixed.py, you will run the server using the setarch(8) binary to disable address space layout randomization (ASLR). - For
randomized.py, you will run the server normally (i.e., $ ./server <PORT>).
The initial code in fixed.py and randomized.py will download the file /index.html and print it to the screen.
The Environment
The server binary was compiled for a 32-bit system without “large file support.” Normally, this would not be an issue since we’re not dealing with files larger than 2 GB. However, it turns out that the NFS home directory mount on bertvm and ernievm has more than 2 billion inodes. As a consequence, the server fails with a cryptic error message.
The upshot is that to run the server on bertvm and ernievm, you’ll need to copy the webroot directory to a directory in /tmp. I recommend you create a directory $ mkdir /tmp/<username> and copy webroot there.
Getting started (with IDA)
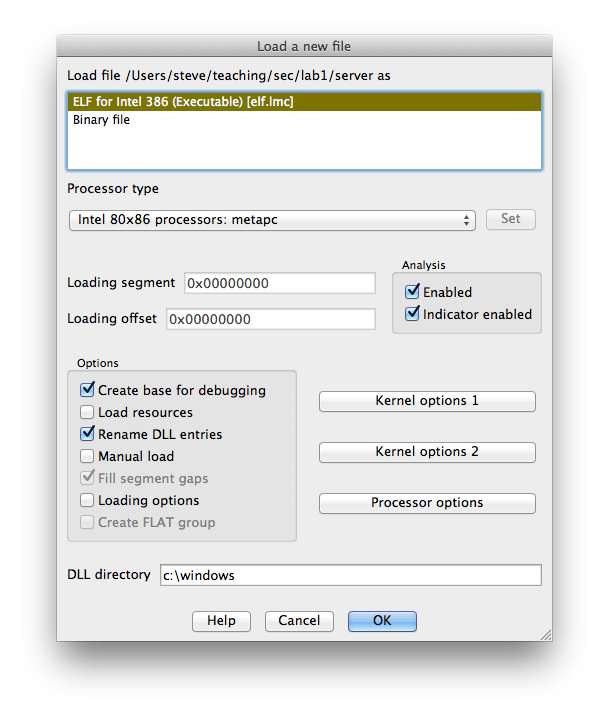
Open the server binary in IDA.
With the main window selected, press spacebar to toggle between graph view and linear view.
In the Functions window, double clicking on the name of a function jumps the main window to that function.
Double click on start to move to the start function.
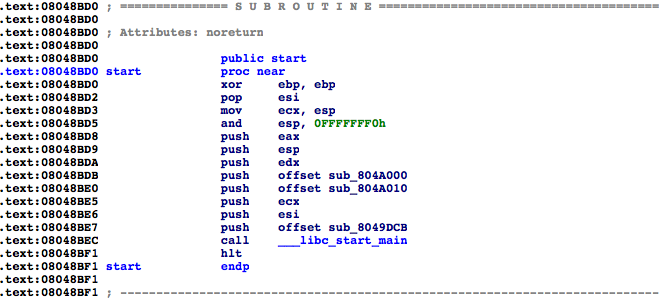
The first argument to __libc_start_main is the main function.
Select sub_8049DCB by clicking on it. Let’s name it main by pressing n to rename it.
This has updated our functions list in the Functions window. Examine the main function by double clicking on its name, either in the Functions window or in the assembly listing.
If you are not currently in the graph view, press the spacebar to enter it. Scroll around the control flow graph either by clicking and dragging in the graph overview window or in the space between functions in the main window. The colored arrows have the following meanings:
- Blue: unconditional jump
- Green: conditional jump taken
- Red: conditional jump not taken
Let’s take a look at the code surrounding the call to _socket.
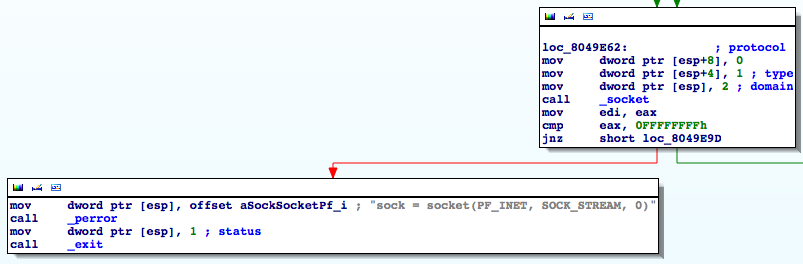
We can immediately see that the assembly was produced from code similar to the following:
sock = socket(2, 1, 0);
if (sock == -1)
{
	perror("sock = socket(PF_INET, SOCK_STREAM, 0)");
	exit(1);
}
Notice that the error message contains the symbolic constants used although the code only contains the numeric values.
If we are so inclined, we can have IDA replace the numeric values with the constants. First, select the domain parameter, 2, by clicking on it. Right clicking opens a contextual menu. Select Use standard symbolic constant and then select PF_INET from the list. Similarly, select SOCK_STREAM for the type parameter. In general, we won’t have error messages that tell us what the constants we want are. In that case, we can look through the manual page for a given function to see in which system header file it is defined and then look through the header file to find the value of the constant. IDA does a good job of only suggesting constants with the appropriate numerical value, most of the time.
Identify the loop in the main function. Loops can easily be identified in the graph view by arrows that point toward earlier blocks of code. Clicking on a jump target will also highlight the label.
In addition to calling standard library functions, each pass through the loop calls a function in the server binary. Since this is a webserver, we can surmise that this function is responsible for handling web clients (i.e., browsers). Rename this function from sub_... to handle_client the same way we did with main.
Let’s identify the two arguments to handle_client. Start by selecting ebx in the mov [esp], ebx instruction just before call handle_client. All instances of ebx are highlighted in the assembly. Looking up the code, we see that ebx is set most recently by the return value of the accept function. By checking the manual page for accept(2), we see that it returns a file descriptor (an integer) corresponding to the newly opened socket. So the first argument to handle_client is the socket, which makes sense.
The second argument to handle_client, which is passed in [esp+4], comes from esi. By selecting esi, we see that it is used in several places but it is only assigned once via the lea instruction following the call to listen(2). esi is set to an address on the stack, namely esp+28h. We see that this address is passed as the buf argument to inet_ntop(3). The manual page reveals that inet_ntop(3) writes a string containing the address to the buf argument.
Slightly more cryptically, but if inet_ntop(3) does not return 0, then the 4~byte word 0x0000002D is written to the first word of buf. Recall that x86 is little endian so this is stored as 0x2D, 0x00, 0x00, 0x00 in memory. By selecting the 2Dh and pressing r, we see that 0x2D is the hyphen character -. Thus if inet_ntop(3) does not return 0, then the address is set to be "-".
Finally, double click on handle_client. At the beginning of the function, IDA has declared a bunch of symbols like var_1120. These are what IDA thinks are local variables on the stack. Some of them have names already corresponding to arguments of standard library functions that IDA knows about. We can change these names as we see fit by clicking on them and pressing n.
In addition to local variables, IDA can deduce information about function arguments. In particular, it knows that handle_client takes two arguments, but it thinks both are ints. We can change this by selecting handle_client and pressing y and giving handle_client the prototype:
void handle_client(int sock, const char *address)
After doing this, notice that the arguments have been named sock and address, similar to the local variables.
Finding a vulnerability
We could, if we wanted, spend a lot of time working out how each function works but our goal is not to understand the complete inner workings of the program. Rather, our goal is to find a way to exploit it.
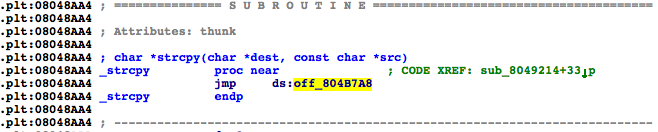
Let’s begin by finding usage of functions which are prone to errors. Let’s start by finding all instances of strcpy(3). In the Functions window, double click on _strcpy. (As an aside, what IDA calls _strcpy is what gdb calls strcpy@plt. We’ll come back to this later.) If you are in “graph view,” press the spacebar to return to “text view.” From the comment CODE XREF: sub_8049214+33, we can see that strcpy(3) is called from exactly one location.
Double click on sub_8049214 to be taken to that function. We can see that the destination argument to strcpy(3) comes from the return value of sub_8048EF9 and by tracing the source argument back, we see that it is the first (and only) argument to sub_8049214.
Examine function sub_8048EF9. From a quick inspection, it should be clear that this function calls malloc(3), passing its only argument and then asserts that the returned value is not NULL. From the argument to the __assert_fail function, we can see that sub_8048EF9 is actually named xmalloc. Rename sub_8048EF9 to xmalloc. This way, if we see it again, we’ll immediately remember what it does.
Go back to sub_8049214 (by pressing esc or by hitting the back arrow in the toolbar). At this point, it’s clear that the function argument is a string that gets copied to some memory allocated on the heap. Furthermore, we can tell that a pointer to this memory is returned. All that remains is to figure out if it’s allocating enough memory to hold the entire string. The few instructions before and after the repne scasb are actually computing the length of the string plus 1 and passing that to malloc(3). To see that, look up the definition of scasb, repne, and not and recall that integers are stored in twos complement.
Since enough space is allocated to hold the contents of the string and malloc(3) is asserted to not return NULL, this strcpy(3) does not appear to be exploitable.
It’s worth noting that this function behaves very similar to the standard library function strdup(3) in that it takes a string as an argument and then creates a copy of it, returning the copy. Rename the function xstrdup (by analogy with xmalloc).
Follow the same procedures to check for the presence of other potentially exploitable functions such as memcpy(3) or strcat(3). By default IDA only displays 2 cross references. It’s helpful to increase this number. Look in Options > General... > Cross-references and increase the number of displayed xrefs to 200. This should be far more than we need.
You should be able to find several buffer overflows on the stack. Which functions have overflows and what input do we need to send over the socket to trigger them?
Since the stack is not executable, we are not able to inject code onto the stack. We will need to try something else.
Before continuing on, you should follow all of the steps above and make sure you can find the buffer overflows.
Writing the first exploit (fixed.py)
We’re going to perform a return-into-libc attack by smashing the stack in one of the error handling functions. From the last section, you should have discovered a buffer overflow on the stack when handling an incorrect HTTP version (as well as a few other places).
Run the server using setarch(8) to disable ASLR.
$ setarch i686 -R ./server <PORT>
A valid HTTP request line looks like:
GET /path/to/file HTTP/1.1\r\n
Modify fixed.py to hard code a request for an arbitrary file (you can use / for the file, if you’d like) and a short, invalid HTTP version string. When the program is run, what is the result? What about a long, invalid HTTP version string?
Compute the distance on the stack from the saved instruction pointer to the location where the version is written to the stack. This can be computed directly from the disassembly or you can use gdb.
Produce a request string that overwrites the saved eip on the stack with an arbitrary value.
Find the address of the exit(3) function in libc (gdb works nicely here) and craft input that will overwrite the saved eip with that address.
When you run the exploit, the server will likely crash before it returns to exit(3). Look carefully at the what happens after you overwrite the saved eip. In particular, some other values that are subsequently used as pointers are overwritten as well. Modify your exploit to overwrite those values with valid addresses. Addresses on the stack work very well.
Find the address of the system(3) function in libc. Modify the exploit such that instead of returning to exit(3), it returns to system(3). The argument to system(3) should be a pointer to a string that contains:
bash -c 'coproc p { /bin/bash 2>&1; }; nc -l 127.0.0.1 <LISTEN_PORT> <&${p[0]} >&${p[1]}'
where <LISTEN_PORT> was the second argument to fixed.py.
This confusing command will create two processes, bash and nc. nc will open a socket on port <LISTEN_PORT>. The coproc command and the various redirections ensure that nc’s standard in is the standard out and standard error from bash and nc’s stdard out is the standard in to bash.
Since you don’t know exactly where on the stack this string will live, you can prepend it with a large number of spaces, similar to a nop sled. Take care that any text after the string is ignored. If you get an error message about bad redirections, you probably did not heed this advice.
After fixed.py sends the exploit string to the server, it should close the socket, sleep for a second (just to give the server process time to run and launch nc), open a new socket and connect to 127.0.0.1:<LISTEN_PORT> and finally pass that to the console function in console.py
At this point, fixed.py should make one connection to the server to send a string to cause the server to return to system(3) opening a bind shell and make a second connection to the bind shell. The first connection should be to the port specified in the first argument to fixed.py whereas the second connection should be to the port specified in the second argument.
Now, you should be able to execute shell commands!
Writing the second exploit (randomized.py)
For the second exploit, the goal is the same (get a bind shell) but this time, you’ll need to deal with address space layout randomization (ASLR).
Run the server without using setarch(8).
Now, if we run fixed.py, the server will crash because we relied on the address of system(3) and the address of our string on the stack. We’re going to need to perform an address disclosure attack to learn where the stack is and where libc is loaded.
Examine the four calls to snprintf(3) in IDA, three of them have constant format strings, one does not. Start the server in gdb. Set a breakpoint just prior to the call to the snprintf(3) that does not have a constant format string and use gdb to print the format string.
Modify randomized.py to provide input which can be used for the format string. Try giving it file paths of the form: ZZZZ%1$08x-%2$08x-%3$08x and then change the 1, 2, and 3 to 4, 5, and 6 and so on until you find the value ZZZZ. You’ll be able to see the output by watching stdout of server. Naturally, this information won’t be available to a real client, but we will deal with that later.
Double clicking on _snprintf in IDA shows the implementation in the plt section:
Although it may not be obvious, this is actually an indirect jump to an absolute address. That is, address 0x0804b7e4 contains a pointer to the actual snprintf(3) function which is set by the dynamic linker after snprintf(3) is called for the first time.
Modify randomized.py so that it tries to fetch a file that contains a format string exploit. This time, instead of ZZZZ%n$08x for some value of n, replace the ZZZZ with the address 0x0804b7e4 (in little endian) and replace the 08x with s. This should cause the server to treat that address as a pointer to a string and print the string. The first four bytes of which should be the address of snprintf(3).
Now modify the file string to addr%m$08x%n$s where addr and n are the values from step 5 and m is chosen such that it prints out the saved frame pointer (ebp) in hex. Hint: rather than just trying value after value like we did to find the ZZZZ, look at the lea instruction just above the call to _snprintf to find the start of the buffer.
In addition to writing the connection information to stdout, the server logs the same information to server.log. Since this is written in the same directory as server, we can fetch it using a normal HTTP GET.
Change randomized.py to make two requests. The first exploits the format string vulnerability to write the address of the saved ebp in hex and the address of snprintf(3) to server.log and the second fetches /server.log.
Read the fetched server.log line by line and look at the last line.
Parse the 8 byte hex string that is the saved frame pointer and the 4 byte integer that is the address of snprintf(3) out of the last line read from the socket.
Add your exploit from fixed.py to randomized.py but make sure you adjust the address of system(3), exit(3), and the pointers to the stack appropriately. Now that you know a stack address, you can compute exactly which address the argument to system should be. Remove the “space sled” that we used for fixed.py since it is unnecessary. Finally, open a new socket and connect to 127.0.0.1:<LISTEN_PORT> and pass the socket to console.
At this point, randomized.py should make one connection to the server to trigger a format-string vulnerability; make a second connection to the server to fetch the log file; make a third connection to the server and, using the address from the log file, send a string to cause the server to return to system(3) opening a bind shell; and make one final connection to the bind shell. The first three connections should be to the port specified in the first argument to randomized.py whereas the final connection should be to the port specified in the second argument.
You should now be able to start the server and get a bind shell by running randomized.py even though the process is protected by ASLR! Congratulations!
Deliverables
- You must include a file called
ID which contains the names of all partners (or just your own if you worked by yourself). - You will submit using the provided
submit.sh script.